a super handy trick to know is saving your prefs in 2.5
If you use the save inside the prefs box then you are stuck with a prefs pane every time you create a new document... but if you get everything as you like it and then hit ctrl + u it will save you current workspace just how you like it.
By the way don't forget to check out the new plugin system in 2.5 when you are digging around the pref panel, you can now turn on and off scripts with this window!
Sunday, November 7, 2010
IOR Values

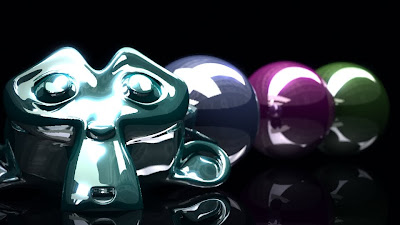
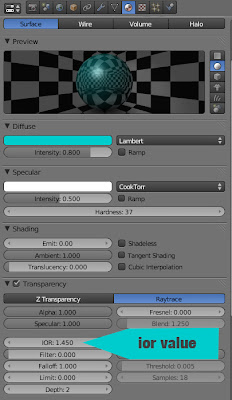
Ior is a great way of adding more realism to gloss surfaces, by adjusting this in the shaders panel in Blender you can get that extra look of finish to your objects. A good lighting setup will help to bring things together. If you are using a gloss surface then you need to think carefully about the environment your object is situated in. Creating a skydome around your object can work well or if you are after a studio setup large area lights can function well.
IOR - The "index of refraction" controls the particular rate and degree that reflections increase with decreasing angle of incidence. The concept of IOR is commonly used to specify the parameter needed control the Fresnel effect in a realistic way. (The glossy "clear coat" layer on top of car paint actually *is* refractive, and the index of refraction controls the reflectivity as well.)
The IOR of water is 1.33.
The IOR of glass is typically around 1.54.
The default value of IOR in car paint is 1.45.
Decreasing the IOR will make the surface less shiny. Do not decrease it below 1. Increasing the IOR significantly past 2 will make the surface appear more metallic. Since the "clear coat" layer on car paint is not a metal, you shouldn't go much past 2 for realism. (In real life, certain extremely expensive paint jobs can get the IOR up to 2.)

haere are some more IOR values which I have taken from info from: http://blenderartists.org/forum/showthread.php/71202-Material-IOR-Value-reference
'Air': 1.000
'Bubble': 1.100
'Liquid methane': 1.150
'Ice(H2O)': 1.310
'Water': 1.333
'Clear Plastic': 1.400
'Glass': 1.440 - 1.900
'Light glass': 1.450
'Standart glass': 1.520
'Heavy glass': 1.650
'Obsidian': 1.480 - 1.510
'Onyx': 1.486 - 1.658
'Acrylic glass': 1.491
'Benzene': 1.501
'Crown glass': 1.510
'Jasper': 1.540
'Agate': 1.544 - 1.553
'Amethist': 1.544 - 1.553
'Salt': 1.544
'Amber': 1.550
'Quartz': 1.550
'Sugar': 1.560
'Emerald': 1.576 - 1.582
'Flint glass': 1.613
'Topaz': 1.620 - 1.627
'Jade': 1.660 - 1.680
'Saphire': 1.760
'Ruby': 1.760 - 2.419
'Cristal': 1.870
'Diamond': 2.417 - 2.541
Tuesday, August 17, 2010
External Render Engines for Blender

Development of Blender 2.5 is progressing well, but there has been a bit emphasis on animation features but those interested in modelling and rendering especially stills artists will still need 2.49 in their workflow.
I am really hanging out for the exporters for external render engines. The Blender internal is actually capable of getting good results however you have to know a few tricks to get things looking the way you want. The unfortunate downside of this can be by adding tricks to get part of your render looking good means that other parts may suffer. Generally there is a workaround but the complexity of doing this can turn rendering into a lengthy process. Time saved in fast render times can easily be lost in long setup tuning times for the Blender internal render engine.
...So that is where external render engines come into their own their lighting and material models often yield better results with less setup time, but they have longer render times.
The main engines worth looking at for use with blender are:
Opensource:
Luxrender: a great quality unbiased renderer, slow but excellent quality, very suitable for architectural visualisation, product renders and design mockups.
Yafaray: one of my favourite renderers, this engine takes a bit more setting up than Lux but strikes a great balance between quality and speed. It is versatile and is suitable for both animation and high quality stills. I have read some occasional critisism of this renderer however I feel that these come from people who are not prepared to take care with their render setup.
Commercial
Octane: This is shaping up as an engine to watch, still in beta stage but shows great speed and detail
Indigo: A good looking render engine, was a free beta that went commercial, the quality of its lighting for big architectural scenes is great!!!
So it's just a waiting game now for the render exporters to be finished for blender 2.5, none of the developers seem to love osx build very much, so if you are a mac user, just relax and use 2.49 for a while (unless you are using a macbook).
Wednesday, August 4, 2010
Learn to use Blender 2.5: Model a Noob Monkey Tutorial
The training material for Blender 2.5 is a bit thin on the ground at the moment, so I have converted the concepts from the old "blender noob to pro" learn to model series into a easy to use guide for 2.5 learners.
This video is suitable for complete beginners to 3d software, just take it slow and follow the steps.
Use a 3 button mouse to make life easy.
You can get the software from blender.org make sure you download a version of blender 2.5 and above, not the old 2.49 series.
This video is suitable for complete beginners to 3d software, just take it slow and follow the steps.
Use a 3 button mouse to make life easy.
You can get the software from blender.org make sure you download a version of blender 2.5 and above, not the old 2.49 series.
JVC Everio OSX problems

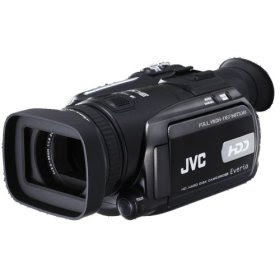
The JVC everio cameras use .tod files which use a type of MPEG 2 compression to get a lot of data (the camera is HD) onto a 60gb hard drive which is okay for a standard def but a little small for a hd camera. The details on using this camera are bit hard to come by so i thought it might be worth sticking up the info here. I usually get a couple of students every year who have the same problem with the camera.
I am unable to import video from my HD Everio GZ-HD7, GZ-HD5, GZ-HD3, GZ-HD6 to iMovie HD6 or Quick Time Player. I am getting one of the following error messages: “The file could not be imported: The file ‘xxxxxxxx.TOD’ can’t be imported; QuickTime couldn’t parse it: -2014” or “The movie contains an incorrect duration."
An update patch for the bundled QuickTime component for Everio software is available for customers with QuickTime Version 7.4 and 7.4.1 and/or Mac OS X 10.5.2 Please visit this site to download the update;
http://www2.cli.co.jp/products/ne/update_qtc_for_gzhd7/qtc3e_update.htm
an I edit HD Everio video with an Apple Macintosh using iMovie 6 HD, Final Cut Pro, or other Apple editing applications?
Yes. Please understand that there are many variations of Apple computer hardware and software. These differences in configuration have an impact on which method is best for editing with the HD Everio.
If you would like to edit with iMovie 6 HD, you will use a USB 2.0 connection and you can choose any available recording mode.
If you would like to edit with Final Cut Pro, you can use an i.Link or USB connection.
With i.Link, you will need to record in the 1440CBR mode. With i.Link, there is no additional software that you need to install. An optional i.Link cable is required.
With USB, you can choose any available recording mode. There are three additional things you must install:
Install the QUICK TIME for Everio component from the CD-ROM that is supplied with the HD Everio camcorder.
Also install the update for the JVC Quick Time component for Everio which can be found at: http://www2.cli.co.jp/products/ne/update_qtc_for_gzhd7/qtc3e_update.htm This update provides compatibility up to QuickTime Version 7.4.5 and Mac OS X 10.5.2.
Setup files for Final Cut Pro for 60i (for USA) need to be downloaded and installed from: http://software.transdigital.co.jp/products/cbs_ev/tutorial_eng/index.html
On the same page there is a tutorial link with individual sections for recordings made in FHD or SP/1440CBR modes. It shows you how to convert the file to either AIC (Apple Intermediate Codec), YUV (uncompressed) format or HDV1080i.
Please also see the Apple editing tutorials which are located here:
http://camcorder.jvc.com/tutorials.jsp
It is also possible to down convert from High Definition to DV standard which can be captured through i.Link and edited with many older Apple editing applications.
Blender 2.5 set centre is now set origin!!
This is one of those changes that i can't get used to... set centre is now set origin.
Hit space and type in origin or shift+cntrl+alt+c to bring up the menu
Hit space and type in origin or shift+cntrl+alt+c to bring up the menu
Sunday, March 21, 2010
Add custom shortcut in blender 2.5
Just right click on the button and select Add Shortcut. Then press your desired key or combination of keys.
Monday, February 22, 2010
Sketchup for Design Tips
Sketchup... its a very intuitive program to use up to a point and then it is let down by really average documentation and a lack of good quality tutorials. This article is in no way a solution to this just a place where i will add some basic info on operations in the program that i had to search for the answer.
The sketchup show podcast is highly reccomended`for some good tips, however the shows are a little disjointed from one episode to the next.
Here are some handy sketchup tips to help you reaching for the search bar:
Align axis: option click on axis to bring up the move dialog box then rotate axis to align axis to north in your document.
More to come!
Subscribe to:
Comments (Atom)